Writing a "Reactale" is actually very easy. Here are the steps to create a Reactale.
1. Go to Reactale.com
2. To start writing a Reactale, you first need to login. The login / signup button icon can be found at the top right corner as shown in the image below


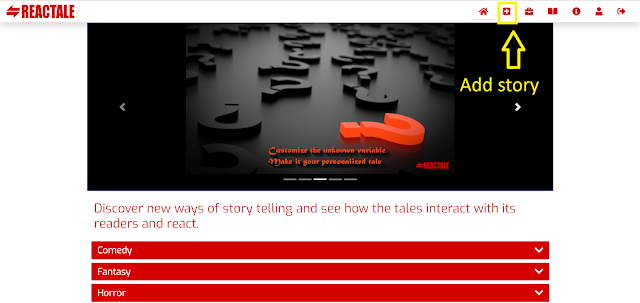
3. Once you are logged in, click on the add or plus ( + ) icon at the top of the page, see image below,


1. Go to Reactale.com
2. To start writing a Reactale, you first need to login. The login / signup button icon can be found at the top right corner as shown in the image below


3. Once you are logged in, click on the add or plus ( + ) icon at the top of the page, see image below,
4. It will tale you to the "Create story" page. Fill out all the fields in the "Cover Details" section and the click on "Save this section". Only when this section is complete, the next section will be enabled.


5. Once cover details section is successfully saved, it will take you to the "Story Editor" section. This is the most important section as this is where we will be crafting our story. First let's see how it looks and then I will explain its individual parts

Here goes a brief description of each of the buttons and components we can find in the story editor section,
i) Save section button - This button will save any unsaved changes that the editor might have sicne last save
ii) TalesFlow button - This will take you to a page where you can visually edit the branching of your reactale. We will cover "TalesFlow" in detail in a later tutorial.
iii) Storylet and Choices - As small drops are called a droplet, likewise here when we say "a storylet" we mean a small part of the complete story. Each storylet will present a small but complete portion, a building block of the entire story. A storylet must end in 0 to any number of choices. Each choice must lead to a different storylet. This is how Reactive Branching works in Reactale
iv) Storylet title - This title is for internal identification purpose only and it will not be shown to the reader of your story. So, give a name that is meaningful to you in a way that it helps you plan and organize and identify different parts your story and gives you an idea at a glance that what is happening in that storylet
v) Storylet body - This is where you will write your story, or part of it. Whatever you write here will be available to your readers once the story is published. It has a "Fullscreen" edit button at the top right of the text area
vi) The ((r)) icon button - This button will let you add "Reacto(s)" to your story. Reactos (or Reactive Tokens) are small piece of text which can give your static text some dynamic abilities. We will cover reactos in a later tutorial. But if you can't stop yourself, feel free to look around and play with reactos in its own website at reacto.reactale.com
vii) The eye icon button - It is a quick preview button of your storylet and can show you how your "Reactive Text" (a text that is powered with Reacto(s) ) will be shown to your readers
viii) Add a choice button - This button will create a choice and a corresponding storylet for you to edit further
Comments
Post a Comment